

Weaving kitchen cloths
Kitchen cloths were one of the first weaving projects I ever attempted. They are really perfect for beginner weavers, as at their most simple they can be just a square of plain weave. And, at the end, the weaver has a beautiful and functional woven piece.
*Please note, this post contains affiliate links.


A very popular cotton is the American made Sugar n Cream. It is just the right weight for kitchen cloths, is affordable and comes in many bright and variegated colours.
There are some beautiful organic cottons out there too, such as Babytoly, which comes in natural as well as bright, happy colours.
I have also successfully used a bamboo cotton blend for cloths. The end result is a little different, the cloth is heavier when wet and does not tend to wear as well over time. Still, it make a beautiful, soft and absorbent cloth. If you're interested in trying a blend, something like this Lion Brand Blend, which is 50% bamboo and 50% cotton would work well.


*Please note, this post contains affiliate links.

If the weaver wants something a little more challenging, adding pick up sticks adds interest to the weave and functionality to the cloth, making the cloth not only very attractive but more absorbent with the added texture.

I am often asked the question "Which yarn is best for kitchen cloths?"
In my opinion, thick cotton is the absolute best fibre for kitchen cloths. It is soft, absorbent, easy to wash and care for, unlikely to harbour bacteria if treated properly and yarns come in many different colours.

My favourite cotton to use for my cloths is from a mill not too far from me. It is a gorgeous cotton, so it makes sense for me to buy and excellent Australian owned and locally produced product.

But, what about those of you who can't access this yarn due to location? Well, there are plenty of alternatives!

A very popular cotton is the American made Sugar n Cream. It is just the right weight for kitchen cloths, is affordable and comes in many bright and variegated colours.
There are some beautiful organic cottons out there too, such as Babytoly, which comes in natural as well as bright, happy colours.
I have also successfully used a bamboo cotton blend for cloths. The end result is a little different, the cloth is heavier when wet and does not tend to wear as well over time. Still, it make a beautiful, soft and absorbent cloth. If you're interested in trying a blend, something like this Lion Brand Blend, which is 50% bamboo and 50% cotton would work well.

I have also had fun buying white or natural cotton to dye in variegated colours, using fibre reactive dyes. You can either use the variegated as warp and a solid, contrasting colour as weft or vice versa - both give wonderful results.

My kitchen will always have handmade cloths now, I can't go back to the disposable cloths I once used!
If you would like to have a go at weaving some yourself, I can help with that!
My Etsy shop has a step by step downloadable pattern "Textured Kitchen Cloths" for rigid heddle loom that you can find here.
Or if visual learning is more your style, you may wish to take this class instead.
My Textured Cloths pattern only needs a small loom to weave, the Sampleit is perfect for this project.
I should also mention my Waffle Weave tutorial on Youtube, which gives great texture for kitchen cloths.
I hope that you will experience the joy of weaving and using your very own kitchen cloths.
Until next time...
Happy Weaving!
4 shaft weaving and sampling
This week I've been working on the sequel to my Introduction to Floor Loom weaving class.
This class will focus on 4 shaft weaving and begins with an optional sampler. I always felt that a sampler was a waste of time and effort, but I have definitely changed my ways! I do a lot of sampling, particularly now that I use a lot of my own designs and need to see and feel how the fabric is going to be before I put it out there to my students. Since I realised what a fantastic learning tool sampling can be, I always recommend it to my students. It can pretty much make or break a project!


This class will focus on 4 shaft weaving and begins with an optional sampler. I always felt that a sampler was a waste of time and effort, but I have definitely changed my ways! I do a lot of sampling, particularly now that I use a lot of my own designs and need to see and feel how the fabric is going to be before I put it out there to my students. Since I realised what a fantastic learning tool sampling can be, I always recommend it to my students. It can pretty much make or break a project!

Plus, when you're finished with a sample, you can either cut it up and use it for small project, or keep it to refer back to. Either way, it's useful!
The next part of the class will move onto 4 shaft kitchen towels, which I designed. Each towel is a little different but equally lovely.
We will weave 4 towels all together.

Here is a sample of the first towel, isn't it gorgeous?
The towels tie in happily with my #weaveforme plans for April, as I will be keeping them for my kitchen 😊
If you're interested in the next floor loom weaving class, make sure you are signed up to my email list for announcements and special offers. Instagram is also a great place to keep up with what I'm doing.
Do you have plans for your #weaveforme project yet? I'd love to hear about it!
#weaveforme April Challenge!
April is challenge month!

We all know that weavers are generous and love to give hand woven gifts. But, how often do you weave something just for you?
I'll be the first to admit that I rarely weave anything as a gift to myself. But, when I do, it's so satisfying!
The challenge for next month is to weave something (anything you like!) just for you.
It could be something you need or just something you want, as long as YOU are the one who gets to enjoy it!
If you need ideas, there are a number of free projects on my Youtube channel and over at my Online Weaving School you are spoiled for choice with many, many projects. Don't forget the patterns available in my Etsy shop too!
On Instagram, share your project photos with the hashtag #weaveforme. You can also share and follow along with what others are doing on the Kelly Casanova's Weaving Lessons group on Facebook.
I hope you can join in the fun!
Alright, thinking caps on! 😀
I deleted my last post and wrote about krokbragd instead!
I had a long post, all ready to go. It was a little bit of weaving and a LOT of life. I'm glad I didn't hit "publish" on that post right away. I'll explain...
The post was written at the end of a really busy week. I had launched a new class for my Online Weaving School, I had made a Youtube video, I had promoted the new class everywhere I could think of to promote it, I had homeschooled the kids and cared for my family, we had been on educational outings, appointments and activities. Yeh, I was pretty tired at the end of that week. And then I sat down to write a blog post.
A little bit of advice to you all - don't write blog posts when you're over tired. And if you do write them, don't publish them! That's all I'll say on the subject for now, except to add that I have now caught up on some much needed sleep and rest and am thankful that, not only did I get over my little self pity party, but also that I decided not to inflict my Whingefest upon your eyes and minds!
Now, let's get to the fun stuff.
I had been wanting to warp up my inkle loom for quite some time, as it has been sadly neglected and I do so enjoy weaving on it, just for something a bit different. My loom is the Ashford Inkle, which is the larger version, they also make the Inklette, which is more petite for smaller and narrower bands.
I didn't know what to warp up, so I took a flick through my go - to Inkle book, The Weaver's Pattern Directory by Anne Dixon. I often recommend Anne's Handweaver's Pattern Directory for 4 shafts, as it is so packed with drafts and quality information and her inkle book is no exception.

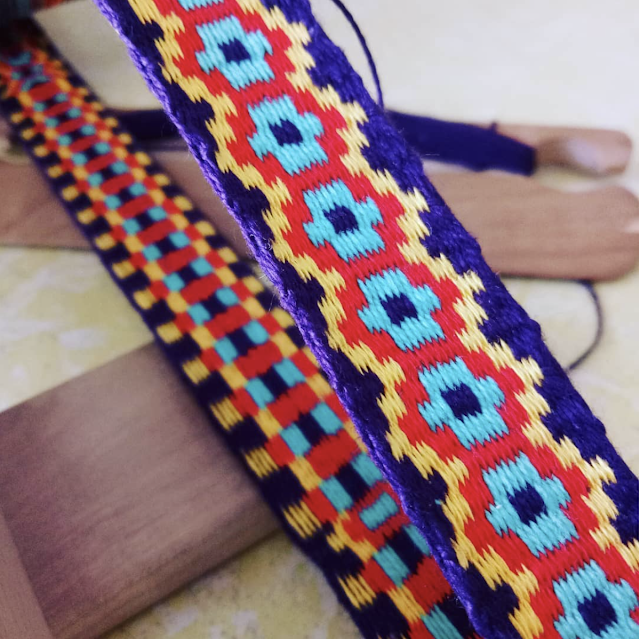
I started by picking out some colours from my stash that I love (always a good way to start a project, even if you're not that confident with colour choices). I ended up with a mixture of mercerised and unmercerised 8/2 cottons. If you're unfamiliar with 8/2 cottons I often use Maurice Brassard as they are great quality and come in heaps of colours. Here is an example of MB 8/2 unmercerised. A comment from Gai has just reminded me of something I wanted to add about mercerised cotton. In general, I don't like to use it on a larger loom, it twists up on itself and is a general pain in the neck. However, on the Inkle loom it's different. Because you warp directly on to the pegs without having to do extra threading or moving of the warp, it behaves itself very well. It is constantly under high tension, so is easy to use and does add a lovely "gleam" to the project.
Being the lover of the weave structure Krokbragd that I am, it was a natural choice. Did you know you can weave krokbragd on an inkle loom? Yes, you totally can!

And, did you know that a krokbragd band is as equally gorgeous as a larger loom project? Yes, it totally is!
So now I'm really excited about the design possibilities for this, though I admit that the design aspect is different to what I'm accustomed to - it's proving quite a challenge for me and is a bit to get my head around. I'll keep plugging away at it though, and I'm sure I'll get there.

I love that the reverse side is just as striking as the front.
As soon as I posted these on social media, people were asking me for a class, which I would love to do once I have some of my own designs up and running. In the meantime, if you have Anne's book or are interested in purchasing (perhaps your library might have it?) this krokbragd design is from page 107.
And, if krokbragd band weaving is of interest to you, there will definitely be more to come!
Thanks for reading, until next time...
Happy Weaving!
*Please note - this post contains affiliate links, meaning that if you click and purchase, I will receive a small percentage of the sale. I only recommend products that I own and love.
Interview with Mirrix Looms
I was thrilled to have the opportunity to interview Claudia Chase, President of Mirrix Looms. You may be aware that I am quite taken by the tapestry looms available from Mirrix and have one on my Wishlist, as I discussed in this post.

Photo credit Williams-Prior Art + Design
When did you first become interested in weaving? How did you learn? What attracted you to it?
I became interested in weaving when I was nine or ten. I saw a rigid heddle loom in the home goods department of Macy’s! My parents bought it for me for Christmas. I was hooked. But that was cloth weaving and it would take me many years to realize my passion was actually tapestry weaving. That happened when I was pregnant with my daughter Elena. There was a tapestry course being offered in San Francisco, CA (United States) where I was living at the time. The class seemed more like a gathering of women who wanted to weave together and not a lot of instruction seemed to be happening. They were also doing some natural dyeing and it struck me that although the onion skins were cool maybe the heavy metal they were using to fix it was not the best thing for my pregnant self. I attended two classes. I learned only one thing: I loved tapestry and I was going to master it on my own.
When did you decide to start a business and how did you settle on a name?
I designed the loom with a friend because I wanted a high-end very portable metal tapestry loom. A metal loom existed called the Hagen but the smallest size was 24 inches and I wanted something really small that I could throw in a bag and haul wherever I might go. I didn’t want to miss any opportunity to get in a few weft passes. I also wanted a loom with a more sophisticated shedding device along with excellent tension. Our prototype was ten inches wide. Sometimes life just happens and the next thing I knew I was in business manufacturing portable metal looms. The name came from the joining of a Greek and Italian verb to mirror or to wonder. I just added “ix" at the end and Mirrix was born!

Photo credit Williams-Prior Art + Design
I wanted to use metal because it is much stronger than wood and one of the biggest failures for small wooden tapestry looms is they cannot withstand the stress of tension and in any case most of them don’t even have a tensioning device. There were a couple of other metal tapestry looms out there and folks were making their own out of copper pipes. I wanted a loom with an easy to use shedding device, perfect tension and portability. We took some old ideas and some new ideas and came up with what we think is the perfect portable tapestry and bead loom.
How many looms do you personally own and which is your favourite?
There are fourteen looms in my studio at this very moment with various stages of tapestries on them. I am always experimenting for new kits, new products and new ways to weave so I need a lot of looms. My favorite size changes over time. For a while I was weaving tiny tapestries on the 5 inch loom. I guess I was looking for intimacy. Currently I am working with all the smaller looms. But I have a lovely piece temporarily in repose on a twenty-two inch loom, which at times has been my favorite size for tapestry. It’s small enough to easily move from space to space and it’s large enough to make a rather substantial tapestry. In the past I have stated that if I could have only one Mirrix Loom it would most likely be the 22 inch loom. But then again, I really do love those smaller looms that peopled my original vision. I would also want one of the smaller looms. Gosh, deciding which one would be quite the dilemma. There is a reason why folks collect multiple Mirrix Looms!
What are your favourite fibre/threads to use and why?
I use wool and silk almost exclusively. I am fascinated with weaving with our hand-painted silk yarn and ribbon. Combining it with wool is magical. For warp I use wool, linen and cotton depending on the project. For about ten years I dyed fleece and the spun it in to yarn. I do hope to get back to that someday because it made my tapestries totally mine.
What items do you love to weave the most?
Lately, I’ve been obsessed with working on smaller pieces. They are little, tiny comments on life and happen quickly so I can move through one a day. In the past I have woven large pieces which take weeks or months to complete. That requires an entirely different mind set. I find lately that I find myself more attracted to the smaller pieces because I can move through a design or color problem much more quickly with small format. I know I will be ready to go back and do a large piece very soon.
What did you do before your weaving business?

Sunshine House provides supported employment for people with physical and mental disabilities. Making a loom is a complex process and the managers there do a fantastic job matching tasks to people’s abilities and setting up work stations to help people with different abilities be successful. It’s a wonderful place and allows people who may not be able to get employment elsewhere to work and to be a part of something truly good.
What are your plans for the future of your business?
We want to continue doing what we’ve been doing all along. We have created a rhythm for doing business whether it’s finding a new audience to developing new looms, accessories and projects. It’s careful and determined. We don’t rush into anything because we want to make sure we are always taking Mirrix in the right direction. Thus far, we have been so lucky with our choices. We do have a new product on the horizon which will allow lightening quick warping of the Mirrix which will both accommodate new weavers but also assist seasoned weavers who want to instantly throw on a warp for sampling or otherwise. We have been working on this new accessory for a year now. It has just survived market testing with flying colors so we are ready to launch!
What advice would you give to someone who is interested in learning weaving?
Start slowly. Sometimes people get into their heads that they want to weave something very complex or very specific and they get frustrated when their skill level doesn’t match their expectations. Weaving is a skill that can take many years to develop. Don’t put too much pressure on yourself and start with the basics and you’ll be way more successful. Giving yourself a strong foundation of weaving skills is very important!

Photo credit Williams-Prior Art + Design
When did you first become interested in weaving? How did you learn? What attracted you to it?
I became interested in weaving when I was nine or ten. I saw a rigid heddle loom in the home goods department of Macy’s! My parents bought it for me for Christmas. I was hooked. But that was cloth weaving and it would take me many years to realize my passion was actually tapestry weaving. That happened when I was pregnant with my daughter Elena. There was a tapestry course being offered in San Francisco, CA (United States) where I was living at the time. The class seemed more like a gathering of women who wanted to weave together and not a lot of instruction seemed to be happening. They were also doing some natural dyeing and it struck me that although the onion skins were cool maybe the heavy metal they were using to fix it was not the best thing for my pregnant self. I attended two classes. I learned only one thing: I loved tapestry and I was going to master it on my own.
When did you decide to start a business and how did you settle on a name?
I designed the loom with a friend because I wanted a high-end very portable metal tapestry loom. A metal loom existed called the Hagen but the smallest size was 24 inches and I wanted something really small that I could throw in a bag and haul wherever I might go. I didn’t want to miss any opportunity to get in a few weft passes. I also wanted a loom with a more sophisticated shedding device along with excellent tension. Our prototype was ten inches wide. Sometimes life just happens and the next thing I knew I was in business manufacturing portable metal looms. The name came from the joining of a Greek and Italian verb to mirror or to wonder. I just added “ix" at the end and Mirrix was born!

Photo credit Williams-Prior Art + Design
Mirrix looms are quite unique in design and aesthetics. What influenced your decisions on materials and style for your looms?
I wanted to use metal because it is much stronger than wood and one of the biggest failures for small wooden tapestry looms is they cannot withstand the stress of tension and in any case most of them don’t even have a tensioning device. There were a couple of other metal tapestry looms out there and folks were making their own out of copper pipes. I wanted a loom with an easy to use shedding device, perfect tension and portability. We took some old ideas and some new ideas and came up with what we think is the perfect portable tapestry and bead loom.
How many looms do you personally own and which is your favourite?
There are fourteen looms in my studio at this very moment with various stages of tapestries on them. I am always experimenting for new kits, new products and new ways to weave so I need a lot of looms. My favorite size changes over time. For a while I was weaving tiny tapestries on the 5 inch loom. I guess I was looking for intimacy. Currently I am working with all the smaller looms. But I have a lovely piece temporarily in repose on a twenty-two inch loom, which at times has been my favorite size for tapestry. It’s small enough to easily move from space to space and it’s large enough to make a rather substantial tapestry. In the past I have stated that if I could have only one Mirrix Loom it would most likely be the 22 inch loom. But then again, I really do love those smaller looms that peopled my original vision. I would also want one of the smaller looms. Gosh, deciding which one would be quite the dilemma. There is a reason why folks collect multiple Mirrix Looms!
What are your favourite fibre/threads to use and why?
I use wool and silk almost exclusively. I am fascinated with weaving with our hand-painted silk yarn and ribbon. Combining it with wool is magical. For warp I use wool, linen and cotton depending on the project. For about ten years I dyed fleece and the spun it in to yarn. I do hope to get back to that someday because it made my tapestries totally mine.
What items do you love to weave the most?
Lately, I’ve been obsessed with working on smaller pieces. They are little, tiny comments on life and happen quickly so I can move through one a day. In the past I have woven large pieces which take weeks or months to complete. That requires an entirely different mind set. I find lately that I find myself more attracted to the smaller pieces because I can move through a design or color problem much more quickly with small format. I know I will be ready to go back and do a large piece very soon.
What did you do before your weaving business?

Photo credit Williams-Prior Art + Design
I wove tapestry before I began the loom business. Before that I wrote and published poetry and worked as an editor. I had founded a poetry magazine back in the day. My interests range from verbal to visual. I believe I have a healthy dose of ability in each.
I love that your looms are manufactured local to you and at Sunshine House. Can you tell us a little about Sunshine House and how this wonderful collaboration came to be?
I love that your looms are manufactured local to you and at Sunshine House. Can you tell us a little about Sunshine House and how this wonderful collaboration came to be?
Sunshine House provides supported employment for people with physical and mental disabilities. Making a loom is a complex process and the managers there do a fantastic job matching tasks to people’s abilities and setting up work stations to help people with different abilities be successful. It’s a wonderful place and allows people who may not be able to get employment elsewhere to work and to be a part of something truly good.
What are your plans for the future of your business?
We want to continue doing what we’ve been doing all along. We have created a rhythm for doing business whether it’s finding a new audience to developing new looms, accessories and projects. It’s careful and determined. We don’t rush into anything because we want to make sure we are always taking Mirrix in the right direction. Thus far, we have been so lucky with our choices. We do have a new product on the horizon which will allow lightening quick warping of the Mirrix which will both accommodate new weavers but also assist seasoned weavers who want to instantly throw on a warp for sampling or otherwise. We have been working on this new accessory for a year now. It has just survived market testing with flying colors so we are ready to launch!
What advice would you give to someone who is interested in learning weaving?
Start slowly. Sometimes people get into their heads that they want to weave something very complex or very specific and they get frustrated when their skill level doesn’t match their expectations. Weaving is a skill that can take many years to develop. Don’t put too much pressure on yourself and start with the basics and you’ll be way more successful. Giving yourself a strong foundation of weaving skills is very important!
Thanks to the Mirrix team for a marvellous insight into your looms and business!
I wanted to add that another thing that really appeals to me about the company is all of the excellent instructions and tutorials you can access on their blog and Youtube. These are people who really want you to succeed in your weaving and I just love that.
To find out more about Mirrix, you can visit them at the following places:
Online Weaving School FAQ's
Have you been wondering about my Online Weaving School? Maybe you have visited already but feel unsure about where to get started? Today I am going to address some of my most frequently asked questions!
What is your Online Weaving School?
It's a place I've created online for weavers of all different levels and abilities to learn. Because the lessons are all online, the student can learn at their own pace, in their own time, and in the comfort of their own home.
How do I take a class?
You need to be registered and have an account to purchase classes. This is a simple process using your email and a password. Making an account does not cost you anything.
You can look through the classes available, read a little about them and view the curriculum. Many of my classes are available as single purchase classes and there are quite a few free classes you can take as well.
What is a membership?
You can also purchase a membership. This gives you access to a library of classes and projects. Some of these classes are only available to members. Members are invited to join a special private Facebook group where we share photos, discussions and ideas. There are also occasional giveaways and live videos just for members.
What is the difference between a monthly and yearly membership?
If you want to purchase a membership, you have a choice of paying once per month or once per year. The yearly membership works out cheaper over the course of a year, but many also opt for the monthly membership, as they prefer paying a smaller amount regularly, rather than a lump sum. Whether you choose yearly or monthly, you receive the same benefits for the duration of your membership.
What classes are included in a membership?
Currently, all classes are included unless they are a feature class. At the time of writing this, the two feature classes are Three Heddle Adventures and Weaving Boot Camp, which are available as separate purchases.
Are memberships always open?
Yes, you can purchase a membership at anytime.
What is Weaving Boot Camp?
This is a great opportunity for newer rigid heddle weavers, or those who have not yet gained the confidence they desire. The course runs over 3 weeks and is designed to get you going with your loom with step by step instructions and demonstrations. I have had many students tell me that this was the class that solidified weaving for them.
Is Weaving Boot Camp always open?
No. It opens several times a year, for a limited time. The best way to keep updated on opening times is through joining my email list.
Are all of your classes for the rigid heddle loom?
Most are. I do have an introductory class for floor loom weaving and am working on the second instalment right now. I also have plans for inkle weaving classes, more floor/table loom classes and classes that incorporate other fibre art techniques.
Is there a time limit to watching a class?
No. Once you have purchased a class, you have lifetime access and can view at your leisure. You can go back and rewatch as many times as you wish.
How is your Online Weaving School different to your Youtube channel?
Good question! Youtube is where the idea for my weaving school began. Youtube is mostly a short tutorial format and is fairly basic. My Online Weaving School is not just a learning platform, it is also a community. Classes are usually lengthy, with lots of video content as well as printable PDF's. The general rule is, if you like my Youtube channel, you will love my weaving school!
Any more questions I need to add to this list? Let me know if I've missed any and I'll either answer in the comments or update to include them in this list.
Happy Weaving!
Interview with Goose Nest Weavers
Today I have the honour of interviewing Jessie from Goose Nest Weavers. I first came across Jessie and her husband Lemuel on Instagram. I was instantly smitten with their beautiful images of old looms, stunning weaving and the fact that this husband and wife team are sharing the joy of weaving, faith and life together.
They have inspired me in many ways and I'm sure you will find them equally fascinating.
I love that you and your husband work and weave together. Which of you started your weaving journey first, and how did it all begin?
I began weaving after I was encouraged by a dear friend to give it a try. I bought a small loom and struggled to learn pretty much on my own. After I retired from my job, my husband and I found a really super school where we could spend a week at a time and have personal instruction. We began at the beginning and not only was I in love with the entire process my husband turned out to be a natural at it too. As a small child my Mom had a friend that was an older lady that made rugs for the community on a loom that went back in her family for several generations. I watched her and itched to be allowed to try. I was 10 at the time, so thank goodness she knew not to allow me any where near the loom. Nearly 30 years later after the lady’s death I now have been able to acquire that loom and that was our first antique loom.


Goose Nest Weavers is a wonderful name for a business. How did your business start and what was your inspiration for the name?
Naming the business was easy. We live in a rural area and over the years there have been small villages that have come and gone. We have a small farm and on the property there was once a small settlement that was called Goose Nest. It has become sort of part of our identity now too. Hence, the only proper name it seemed to us, was Goose Nest Weavers.
To be totally honest we are probably the worst business people in the world. We do some custom work on order but as you well know the time required to begin and follow to completion a hand weaving project is time consuming to say the least. So once you have made people aware that an overshot coverlet is not an on demand kind of thing, that there is probably a month or more involved in producing it , the folks that want to go ahead are the fuel for the creative fire. I really get a buzz from folks that see and understand and appreciate the product as well as, the process.
You and Lem weave specifically on beautiful antique looms. Was this a conscious decision for you?
As I explained I had acquired our first barn loom and after very carefully taking it down and numbering and labelling all her parts I quickly realized that there was very little that I could transfer from my knowledge of the modern loom I had been working on. So I set to looking for a place where I could gain the expertise that was going to be required. I guess you could say that we chose the old looms.
We went to study at the Marshfield School of Weaving. The prime reason being that there you work on 18th century looms. It was the best thing we could have done. The folks there walked us through a project and at the end of the week we were feeling very confident. Kate Smith the director of the school has been a great resource for the looms. We have acquired several from her. Most of them came from someone’s barn or attic.. They look like a pile of sticks when we first see them. We bring them back to Lem’s workshop for some TLC and before long they are up and functioning again. Currently we have four old looms that we are weaving with plus one new loom. There are about 4 or 5 more that are waiting to be given a good cleaning and be put to work.


Have there been any challenges or difficulties in working with old looms?
Oh you know, these “old ladies” are quite the characters. Sure there are tricks and tweaks that you have to acquaint yourself with each. Because they are generally pretty old, we have several that are now more than 200 years old, they have been built with a combination of woods, each species reacts differently to temperature and humidity, the “Girls” can be temperamental.
We do our best to keep everything environmentally on an even keel. But, that being said there is nothing more satisfying than sitting down to spend time with a piece of equipment that has become like an old friend and allowing her to glide through a job just as she has for the past two hundred years. You can very nearly feel all the hands that have asked her to work for them over the centuries guiding your hands. We were told early on that looms have a feminine nature. As you move your hands and feet to get her to do your work it is very like dancing with a lovely lady. So it is imperative that you treat her as you would a “lady”. I must admit it seems to work the charm.
Do you have any favourite fibres or threads?
We both prefer natural fibers, we use a great deal of cotton and linen in conjunction with wool in several weights.


What items do you love to weave the most? Do you have a favourite weave structure?
Lemuel enjoys weaving heavier projects. He especially enjoys making rugs, either the traditional rag rug or we have become acquainted with a Venetian pattern that dates back to a weaver in the 1700's.
I prefer making household linens. Towelling and blankets. However, my all time favourite is Overshot and Summer & Winter coverlets.
What did you and Lem do before your weaving business?
My goodness we have been jacks of several trades. Lemuel worked with his family on the family farm and when his health dictated a change he had his own business as an Equine Dentist.
As the wife of a farmer I worked on the farm too, while working as a medical office receptionist and later as a letter carrier for the Postal Service on the side.
What plans do you have for the future of your business?
Go slowly. Enjoy what we are producing. Make sure that what we are asking the looms to produce is something that we will proud to put our names on and be associated with for many years maybe generations to come.
We have become aware of several 18th and 19th century weavers that worked in our community. Once folks found out what we doing they have brought us their family treasures to share with us the skills of the generations of their families. We want to be producing coverlets and rugs of a quality that will allow the folks that own them to pass them down their families with pride.

Do you have some advice for those who are interested in learning to weave?
I would say don’t worry about starting a business. Allow yourself to fall in love with the craft. It requires a steady hand, the time to do a thing properly. If you will do those things you will find that there is so much that artistically you can explore. Color, texture, fibers, more and more.
Find someone who you can depend on to mentor you. I’m old school and a real person is good for me but you younger minds can probably make the internet work for you. The craft of weaving has been around since before the pyramids and the process is essentially the same, the only difference is that the creative spark that you have is yours alone and it can make a very big impression if you set it free.
You can visit Goose Nest Weavers on Instagram
and
check out their Etsy shop.
You can visit Goose Nest Weavers on Instagram
and
check out their Etsy shop.
Going around the edges
There are times when you are weaving something other than plain weave, you enter into the shed, weave the pick, but then realise the yarn has not wrapped around the outer edge warp thread.


If you continue to weave, your edges will be wonky and they will be unstable.
Fortunately, there is a quick and easy fix to this problem!
You could add floating selvedges and ensure that you go around them between each woven pick.
OR
You can go around the edge thread manually, which is really, really simple.

Usually, if you're weaving a repeating pattern, the problem will occur on the same side, in the same shed. For me, on this particular pattern, it was the down shed.
By simply entering the shed by first going over the edge thread, you fix the problem. The weft yarn wraps around the edge warp thread, and all is right with the world again.
In these photos I am weaving my brand new Etsy pattern, the Rainbow Lap Blanket. I designed this pattern for little loom weavers who crave to weave something large and also for those who are in a cold part of the world and wish to snuggle up with something bright and warm. I hope you love it as much as I do!


Oh, before I forget, there is a companion video to this blog post, just in case you need to see how it all works!
Until next time...
Happy Weaving!
How to make a warping stand
Recently my husband made me a warping stand. I had wanted one for a long time, but the store bought ones are very costly. I showed him some pictures and explained the function to him and he was more than willing to make me one.
When I showed the finished stand on social media, it received quite a response, and many of you wanted to know how to make one too. Being the wonderful man he is, my husband agreed to not only draw up plans and measurements to share with you all, but also to film a Youtube tutorial.

We only have very basic woodworking tools, but you can do a lot with a little elbow grease.
This is not a difficult or complicated project. It does not take a lot of experience or skill to complete, and it gives an excellent, functional warping tool that is sturdy and user friendly.
Along with the Youtube video, we wanted to provide some instructions here to help you understand the project.
Lets start with the tools we used:
*Electric drill (this drill kit is similar to ours, affiliate link)
*Drill measuring rod (ours came with the drill)
* Wood boring bit 13mm and 10mm
*Piece of rubber or non slip matting
*6 x eye screws, 23mm length, 2mm diameter
*8 x 10 gauge, 45mm screws (we used square head)
* Square drive drill bit, no.2 (ours came with the screws)
* Drill bit same size as screw body for pre-drilling screw holes
* Handsaw
* PVA glue (small amount)
* Ruler
* Sandpaper, medium and fine
*HB pencil

And the wood materials for the stand:
We used premium pine.
*Base piece- 30cm (11.8") length, 19cm (7.3") width, 3cm (1.2") depth
*Side pieces (x2) - 34cm (13.3")length, 4.3cm (1.6") width, 1.9cm (.6") depth
*Top piece (x1) - Same measurements as side pieces
*Dowel pieces thick (x3)- 17.7cm (7") length, 12.7mm (.5") thickness
*Dowel pieces thin (x3) - 17.7cm (7") length, 9.5mm (.37") thickness

Here are some little diagrams that my husband drew up that you can use alongside the video in case you get a bit lost.
He said that the measurements do not have to be exact and that you can always work around little inconsistencies, so definitely don't obsess over the numbers, this is all more of a guide.

This is not a stand along blog post, you really do need to refer to the video as well, so please, use them together!
One of the best parts of this project is the overall cost comparison to store bought. If you already have some of the tools, as we did, the stand should come in at around $25 - 40, depending on where you are and the cost of materials.
If you already have the wood, tools and bits and pieces, you could be looking at a totally free project!
We hope that these instructions allow you to experience the satisfaction of making your own stand. If you have any questions, let us know!
Subscribe to:
Posts (Atom)
This blog is closing!
All posts will now be found at my new site. Click here to go the the new site.

-
 Have you heard the news? I am currently working on an exciting weave along! The project is Krokbragd Mug Rugs for rigid heddle loom an...
 -
 Welcome to this very special giveaway! To celebrate 10,000 subscribers on Youtube I have the pleasure of giving away to one of you lucky pe...